|
|
|
|
|
|
|
|
|
|
|
|
|
|
|
|
|
 |
 |
|
CENTRIFUGAL FORCES
EXERCISE 1 - THE ROTOR MODEL
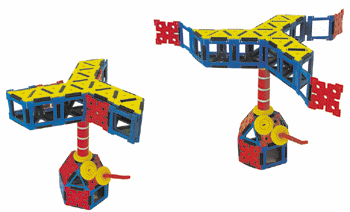
Then build the vertical axle using red cylinders and white cylinder connectors, with a yellow cog at top and bottom. Fix the axle to the base, and adjust the position of the hinge connectors to ensure you have a good connection between the axle cog and the base cogs. Now build the 'rotor' with three arms using triangles top and bottom, joined with squares. You can make the 'rotor' lighter by using either all frames, or a mix of frames and solids. On the end of each arm, using a blue 3 way connector, attach a square frame and a square, putting the heavier square at the end. These are the 'flaps' which will demonstrate the effects of centrifugal force. Now fit the 'rotor' to the vertical axle. Fold the flaps inwards, in the opposite direction to the rotation of the axle. Now turn the handle as fast as you can and watch the flaps swing out. Now tie a piece of string (about 4 inches long) to the end of each arm of the rotor, and turn the handle. Watch as the centrifugal force on the strings takes over from gravity, making the bottom of the strings lift as they spin.
[Klikko Math] [Klikko Science] |
||||||||||||||||
 Start with the base which has a hexagon footprint and then is tapered up to a triangular top, using squares and triangles alternately on the second level up. Put the two cogs and the handle on the side. Make sure the handle is firmly inserted.